|
|
|
|
|
|
|
|
|
|
|
|
|
|
|
|
|
|
|
|
|
|
|
|
|
|
|
|
|||||||||
|
||||||||||||||||||||||||||||||||||||
A golf game by John Kotas |
||||||||||||||||||||||||||||||||||||
click Download Now! button to download Texting Minigolf 1.1 |
|
|||||||||||||||||||||||||||||||||||
Click HERE to Download Texting Minigolf 1.1 if Download Now! button doesn't function |
||||||||||||||||||||||||||||||||||||
|
||||||||||||||||||||||||||||||||||||
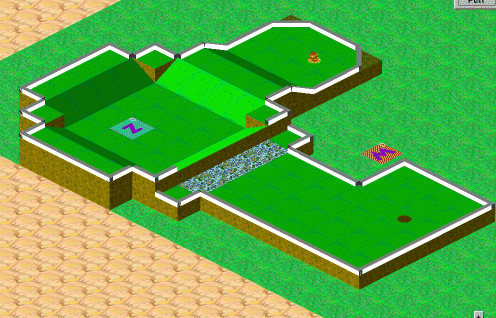
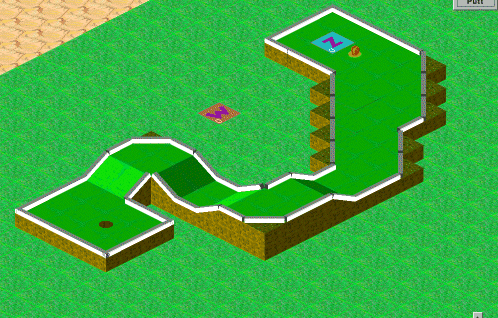
Welcome to a miniature golf course that challenges your putting ability as well as develops your imagination for course design.
Texting Minigolf is a completely customizable minigolf world with you at the design controls. Not only are the graphic details controlled by you, but the hole by hole MIDI music selections are
left up to your discretion. This version comes with 171 pre-designed holes, but there are unlimited possibilities for you to design each and every hole given the tools supplied for hole and
course creation.
Texting Minigolf allows you play minigolf over the internet with another player. You can design a course on your computer and load it up to him or her
once you have established a connection between your computers. You can both text to each other while connected and playing. The relationship the both of you has is a peer to peer one. Connecting is easy and playing a game is easy.
It's up to you guys once you start playing. The rules are minigolf rules, but the possibilities are endless given the tools supplied for course creation, the ability to text what you want, and the ability to play minigolf any way you want.
Knock the other players ball away from the hole with your ball, go for holes in one, and develop impossible holes. Have Fun! Here's a list of who designed which .cor files. Tom Galownia was the pioneer in designing his course file after his real world "Xtreme Golf" in Ohio. You can find out more about "Xtreme Golf" at Tom's website: http://seven-creeks.com His email is: Tom@seven-creeks.com He designed: 18_xtreme_holes.cor Elsie and Lyn from South Africa really got into the design process and put together 3 courses. One 18 and two 9 holers. Their joint email is: lynpeens@xsinet.co.za They designed: Bluebush_18_holes.cor Riverbend_9_holes.cor Johburg_9_holes.cor A super professional job has been accomplished by Dave from Rochester, New York in his 18 hole course. See for yourself. His email is: davedz@netacc.net He designed: Ace_City_18.cor
Brian John Hall has set out to design the most electric and convoluted two 9 hole courses I've seen so far - in a good way. His email is: brian.hall3@tesco.net He designed: NightmareRidge_9.cor SnowHavenValley_9.cor Daniel Burnham has gone beyond. He has created phenomenal courses, and has added some unreal music tracks. Y. Mitsuda is the tracker for : Mild_Meadows, and N. Uematsu is the tracker for : Balance_And_Ruin. Daniel's email: dburnham@mail.countryfcu.com He designed: Mild_Meadows_18.cor Balance_And_Ruin_18.cor I put together the remaining courses. I included MIDI music I found on the web for my courses. My email: johnkotas@hotmail.com I designed: 18_awesome_holes.cor 9_fantastic_holes.cor 9_superb_holes.cor
9_great_demo_holes.cor Getting started playing the courses: Whenever you begin a minigolf session, you are presented with the choice to play a course or
begin the "hole editor". You probably want to begin by pressing the play course button. At this point, there are fields for entering up to 4 player names. Click the mouse inside a field
to begin entering a name. If you type names into the fields, this determines the number of players for the game. (Leaving any of the name fields blank means that there will be no player for that slot).
So it becomes obvious that the game can be played by 1 to 4 players. Each player also has a ball type choice. Select the desired ball type by pressing the arrows to the right of the list box.
You'll notice that once you begin playing a course, from the config pulldown menu is a menu coice of Tile Scheme. You can you this to adjust the graphics of the course while playing a particular course or while
using the Hole Editor. The load course dialog now appears, and you are given a chance to select a file with a .cor extension. This is a course file.
The trial version of Texting Minigolf allows you to play minigolf for free for 3 days. After that time you must register the game for $10 to continue playing.
Select the course you wish to play and press the open button. The screen will center on the first player and the putt button will be visible. Pressing the putt button
reveals a blue putter that rotates around the ball based on the mouse position. Rotate the putter behind the ball and press the LEFT mouse button when you are satisfied with the putt strength and
position. Press the RIGHT mouse button to move the strength meter out of your viewing direction. The RIGHT mouse button toggles the strength meter between two locations. If your putt is very
strong, the ball can jump over the hole railings, so be cautious. Zooming and Rotating - Even 3D Rotating: In the lower right of the screen are the zoom in and out and rotate buttons. Use
these at your leisure to adjust your view. Also, move the mouse to the edges of the screen to pan. NOW, hold down BOTH the Left and the Right mouse buttons at the same time before or after putting and move
the mouse - this allows you to move the entire playfield in 3D mode to any degree of your fancy. The score card shows you the holes available for the course, the par for the
holes, and the number of strokes each player has had for each hole. The leader board dialog box keeps track of the five lowest scores for the number of holes being
played in the course. Check back to the leader board if you think you have a really phenomenal round. If you become frustrated on a hole, choose to pick up your
ball and suffer a 12 stroke penalty. Sometimes this is better than hanging around a hole forever. Choose go to hole if you want to play a specific hole on the course
and don't want to play all the holes. You can also go back to a hole after you've finished playing a course. Be advised that once Go To hole mode has been activated, the score card is no longer
available.
Starting the hole editor: If you choose to start the hole editor, you are given the opportunity to develop your very
own minigolf hole. Placing Objects with hole editor:
Generally the rule is that if you LEFT mouse button click when building an object, the object appears or builds upwards. If you RIGHT mouse button click when building an object, the object disappears or is
built downwards. Certain objects, like holes, sand, water, and conveyor belts can only be constructed on a level 1 or higher flat block. The hole editor "knows" where you're at, so it will
display an outline when building is possible. Warp zones are limited to a total of ten (thats w-z from 0-9). Also, before you save a hole, always be sure you have placed the ball in some
location. The "tee" will appear at that location (a yellow circle with a red spot) and this is where the ball will start. If you are putting on your hole, and you happen to sink the ball in
the hole, remember to use the place ball or "tee" object again BEFORE saving because the tee disappears once you have sunk the ball. (Note: try not to build blocks up around and over a ball once
you have placed it as this will cause putting to behave strangely AND when you build water or conveyor belts you will have to place the "tee" again). After you have saved the hole with the tee in
place, it really doesn't matter what you do to your hole, just remember that the "Save Hole" leaves the hole in the condition WHEN it was saved. The hole editor is very easy to use once you get the
hang of it. After all, it's how I designed every hole in the package. |
||||||||||||||||||||||||||||||||||||


|
|
|
|
|
|
|
|
|
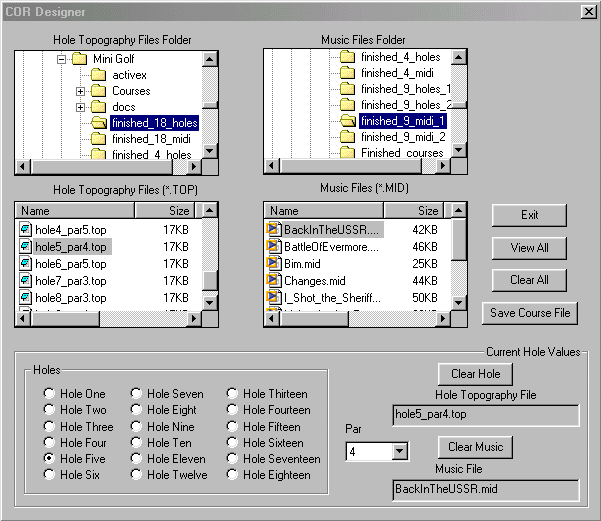
The Course Designer makes the creation of .COR files a snap. The trick to saving a hole topography file in the hole editor is to save the hole number and the par
you decide on WITHIN the filename. Then when you open the Course Designer, the selection and par for a particular hole is obvious. You can select holes from any number of directories as well as MIDI
files (.MID) from any number of directories. The number of holes for a course is only determined by the number of holes you select in the Course Designer. As soon as the program comes across a hole
that doesn't have par or a hole topography file specified, the course is complete. So you can have courses from 1 to 18 holes and any number in between. (If you decide not to specify a MIDI file for a
particular hole, you will not have background music for that hole.) MIDI files can be found all over the internet, just do an internet search to retrieve the ones you like. One place I found MIDI files
is www.ifni.com By the way, .COR files are HIGHLY compressed, so if you decide that you'd like to
share your creation with others, you do not need to zip them across the internet. You can simply send them to others as attachments "AS IS", without the need to further compress them.
A few words on Dead Eye Golf Dead Eye Golf was written by me many years ago and is a 16-bit app. XP does alright with it, but Vista and Win 7 don't like
it too much. If you want to get it to run on Vista, 7, or a 64-bit Windows operating system, you need |
|||||
|
|||||
Game speed and graphics concerns: The game was developed on an AMD Athlon at 900Mhz, so a comparable or better processor is recommended.
Your graphics card must support OpenGL. If the game appears to run sluggishly on a fast computer, you probably have an old version of OpenGL - Visit your graphics card manufacturer's website to get the
latest OpenGL drivers. If you have Windows 95 or 98 you might try to visit the following site since it specifically caters to 95/98 systems: |
|||||
|
|
Purchase License Code: You have 3 days uninhibited trial period to test out Texting Minigolf. If, after that time, you wish to
continue playing the game, you must pay $10 to purchase the license code for unlimited future use of the game. This is a one time fee that grants you full use of the game forever. If you would like to buy your license
code now visit Paypal at the following link: Click HERE to buy Texting Minigolf License Code NOW! Thanks for playing ;-) |
|
|
